This chapter contains the following topics:
Introduction to Transaction Processing Login
Logging into the Transaction Entry Screen
Understanding the Screen Layout
The Passport Business Solutions Point of Sale gives you the unique capability to log purchases using advanced order processing or point of sale processes in one integrated system.
In order processing environments, salespeople may need to access information that is not required in a retail point of sale environment. Information about purchase orders, ship dates, shipping methods, customer information, including terms, credit limits and discounts, item costs and availability, etc. may be routinely referenced during a typical order process.
Point of sale transactions are usually handled quite differently. “Point of Sale” refers to the location in a retail environment where a sale takes place. A customer usually has an item in hand and is prepared to pay for it immediately with cash, a credit card or a check. Traditionally, cash registers are used at the point of sale to record sales.
Passport’s Point of Sale system will function in a retail environment by combining the functions of a cash register with the collection of sales and management information using computer software.
Passport BreakOutTM will streamline the process for your particular needs whether you are processing orders over the telephone or sales at a retail counter. Refer to the System User documentation for information about customizing the data entry the system to your needs.
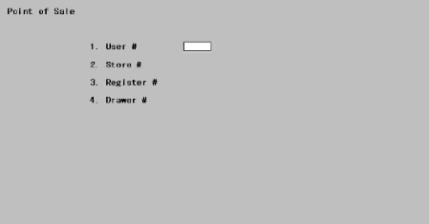
You must log into the transaction processing screen for the PBS Point of Sale providing a user number, a store number, a register number, an optional drawer number and an optional password.
Select
Transactions from the Point of Sale menu. The screen displays as follows:
1. User #
Enter your user number.
|
Format |
Up to 3 characters |
|
Example |
Type JM1 |
The user number you enter here must be a number that was set up using the User selection from the Setup information menu.
Password
If you have specified that you will use user passwords, in Control information, to limit access to Point of Sale transaction processing, you will be prompted for your user password.
Enter your password if prompted.
|
Format |
Up to 10 characters |
For security reasons, your password will not be displayed on the screen as you enter it.
2. Store #
Enter a number of the store for which you are processing transactions.
|
Format |
Up to 3 characters |
|
Example |
A for store number A |
3. Register #
Enter the register number for the register you are using.
|
Format |
Up to 3 characters |
|
Example |
Type 1 to use register number 1 |
4. Drawer #
If the register you are using has a cash drawer, enter the drawer number here. The drawer you specify must be open.
|
Format |
Up to 3 characters |
|
Example |
Type 1 to use drawer number 1 |
If you receive the message
Options
after entering a drawer number, you will have the option to proceed or to enter a different drawer number.
|
Y |
Answer Y if you were previously using the drawer to enter transactions and your session was abnormally terminated |
|
N |
Type N if you entered the wrong drawer number |
From the Point of Sale transaction processing screen you create new transactions or work with existing transactions. The next chapter describes the screen layout, the different screen areas and their function.
The Passport Business Solutions Point of Sale transaction entry screen has been constructed for optimum data entry in point of sale and order processing environments.
Use of Passport Business Solutions BreakOutTM allows data entry to be customized for each user or standardized for a group or all users. For optimum customization of the transaction process refer to the Breakout chapter in the System User documentation.
A Passport Business Solutions transaction is comprised of header information and one or more line items.
The top third of the screen is used to specify data that pertains to the entire transaction. Information such as the transaction number, customer and shipping information is entered, when applicable, in the header area. In a point of sale environment, BreakOut is often used in this area to auto-fill these fields.
The middle third of the screen is used to enter the items or services that are being purchased. This is a scrollable area that can display up to five line items at a time. During transaction entry, you may scroll through the line items making any desired changes.
To the left, in the bottom third of the screen, is the message area. The message area is used to guide you and prompt you through the transaction entry process. This area will list processing options that become available as you process this transaction.
The message and prompts that are displayed in the message area may be toggled on or off in the Point of Sale Registers. You may wish to display these prompts initially. When you become familiar with the system, turning these prompts off can speed up transaction entry.
The subtotal area displays up to the three subtotals for the current transaction:
Gross
This subtotal accumulated for every line item on the transaction assuming that all items will be shipped. This includes services and all items that are out of stock or have been back ordered. The Gross subtotal is always displayed.
To-ship
This amount indicates the total for shippable items. Services are included in this subtotal since they do not involve a physical entity. This subtotal does not include back ordered or out of stock items. The To-ship subtotal is displayed for transactions with shippable items and services. This subtotal will not display for quote type transactions (Type Q).
Selected
This subtotal indicates an amount for items that have been selected for billing and can be shipped. This subtotal is only displayed for order type transactions (Type O) when one or more items have been selected for billing.
|
Note |
The Bill Total is calculated based upon the first subtotal displayed in the Subtotal Area. For example, if an order is partially selected, all three subtotals will be displayed, but the “Selected” subtotal is displayed first. The Bill Total will be based on the “Selected” subtotal. |
This area, in the left corner of the bottom third of the transaction entry screen, is used to enter a transaction discount, miscellaneous charges, freight and a tax code. The Bill Total is displayed in this area. In a point of sale environment, BreakOut is often used to auto-fill these fields.